Ampy Documentation
Table of Contents
- 1. Installation
- 2. Setting up demo content (optional)
- 3. Theme Options
- 4. Page Templates
- 5. Portfolio
- 6. Menus
- 7. Accelerated Mobile Pages
- 8. Easy Speed Optimisation
- 9. Images & Image sizes
- 10. Widgets
- 11. Common Problems
- 12. Recommended Plugins
1. Installation
1.1. Theme Upload
First you’ll need to have WordPress installed.
You can find out more about that here:
https://codex.wordpress.org/Installing_WordPress
You have three choices to upload your theme:
- Via FTP – First unzip the theme and using your FTP program upload the theme folder into /wp-content/themes/ on your server.
- WordPress Upload – Login to your WordPress website, within the admin screens navigate to Appearance > Add New Themes > Upload. Then browse to the zipped theme folder and click ‘Install Now’. You may need to wait for a few seconds before the file uploads.
- Envato Market WordPress Plugin – Install the Envato Market plugin as explained in the 1.3. Enable Automatic Updates section and set up your Envato token. You can click the theme install button from the “Envato Market” menu in your WordPress dashboard.
Once the theme is on your server or uploaded, you need to activate it, just go to Appearance > Themes and activate Ampy.
1.2. Suggested Plugins
When you first install the theme, you’ll notice that we request you install the following plugin…
MeanThemes Tools
This is needed to allow the custom Portfolio type to work correctly and also comes with handy speed optimisation settings (more on that later…).
Click “Begin installing plugin”
Then hover over the Plugin name and click “Install”
Envato Market WordPress Plugin
Automatic updates are provided via the Envato Market WordPress Plugin.
You can follow the same steps to install and activate it.
Visit the new “Envato Market” menu item from your WordPress dashboard and input the token generated from build.envato.com and hit the save button.
You will now receive theme updates automatically from the standard WordPress update page.
1.3. Regenerate Thumbnails
We always recommend installing the Regenerate Thumbnails plugin when you install a new theme, this will create new versions of your uploaded images to the correct dimensions for this theme.
You can find the plugin by typing “regenerate thumbnails advanced” into the plugin search (Plugins > Add New) and installing from there. Alternatively, you can download it from: https://wordpress.org/plugins/regenerate-thumbnails-advanced/
We’ll go through this in more detail under the “Image Sizes” section, next.
2. Setting up demo content (optional)
When you install our theme you’ll see that it is pretty much blank (unless you are activating on a current website).
If you are starting with a blank website, you may want to install the demo data…
2.1 Importing Demo Data
In the main zip download from ThemeForest you will find a folder called “Demo Imports”.
In there you will find the import files .
To import all of the website content make sure you have activated any plugins that are needed.
e.g. MeanThemes Tools Then find the XML file called ampy-content.xml for the import with the images in the demo (https://ampy.mtdemo.meanthemes.com/).
Go to your WordPress install and choose Tools > Import and choose the option “WordPress”
You will then be presented with an overlay which will ask you to install the WordPress importer plugin
Click “Install Now”
Then “Activate Plugin & Run Importer”
Now choose your file by clicking on “Choose File” then follow the on screen prompts from there.
PLEASE NOTE: If you are also using the Contact Form 7 plugin, please check the email send details to make sure website emails go to your email address and not the [email protected] address in the Demo XML.
2.2 Importing Widgets
To import the widgets you see on the demo, install and activate the plugin: https://wordpress.org/plugins/widget-importer-exporter/
Then in your WordPress admin go to Tools > Widget Importer & Exporter.
Choose the file called ampy-widgets.wie then click “Import Widgets”.
2.3 Importing Customizer settings
The demo website is using the default Customizer settings.
3. Theme Options
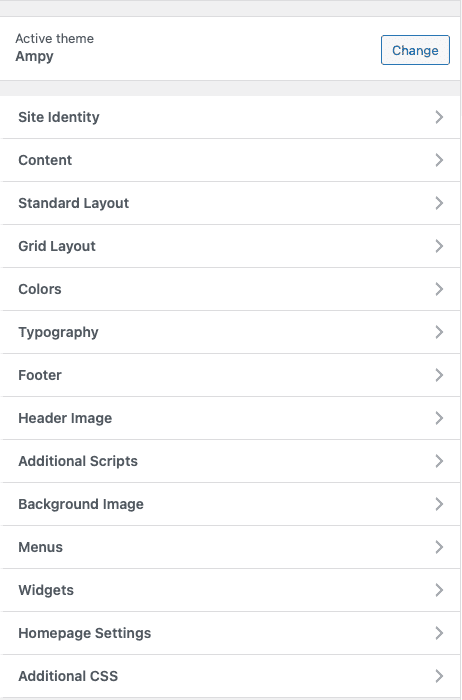
Initially, this is where you will spend most of your time. We’ve used the built-in Theme Customizer for this theme.
Go to Appearance > Customize
This page is broken down into options on the left and a live preview of the website on the right. Most of the settings will auto-update in the live preview window, please note in order to save your changes you must click the blue “Publish” button.
If a setting doesn’t seem to update, don’t panic, click “Save & Publish” and then refresh the Customizer.
3.1 Site Identity
Edit the main site title and tagline here. You can also upload your main logo and an image that will be used for the favicon and any device icons, for example adding your website to the homescreen of an iOS device.
3.2 Content Options
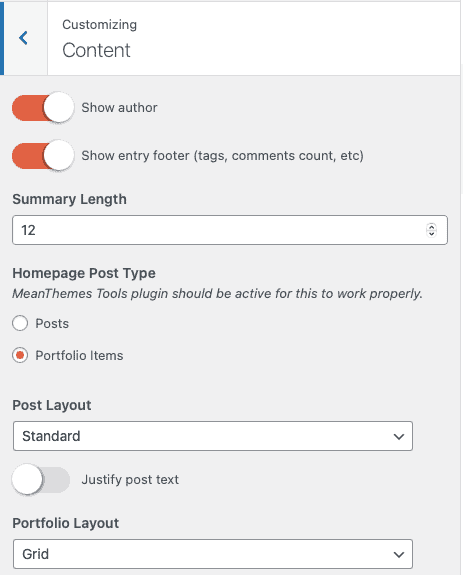
You can adjust the overall display of your content here.
This includes:
- Show author name with link
- Show entry footer (tags, comments count, etc)
- Summary length in words
- Homepage post type
- Post layout
- Justify post text
- Portfolio layout
Items per page are set the usual way from WordPress Settings > Reading.
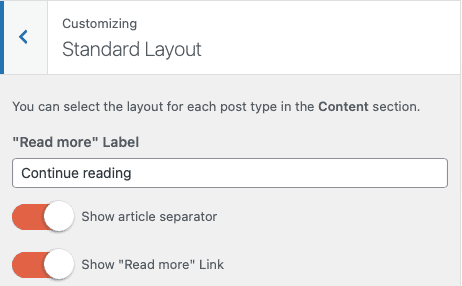
3.2 Standard Layout Options
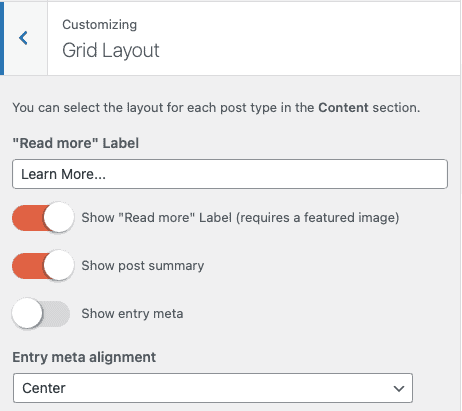
3.4 Grid Layout Options
3.5 Colour Options
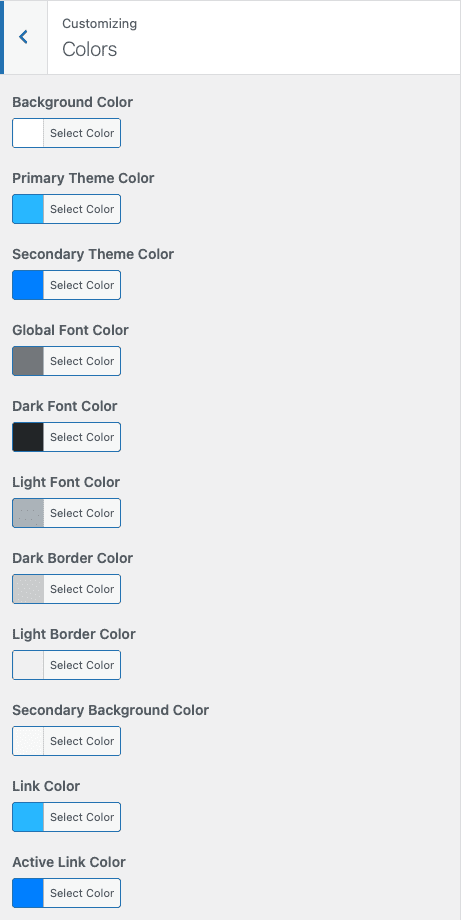
This section lets you control all of the main text/font and background colours
3.6 Typography Options
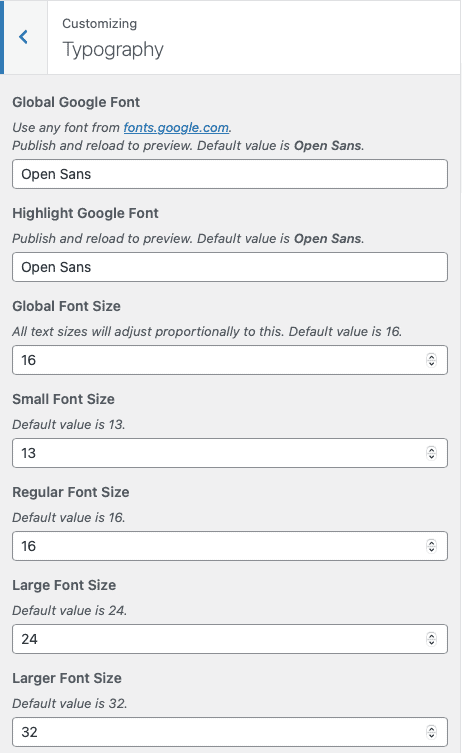
You can choose to use any Google Font for the global text and headings. The theme is optimised to only load the fonts mentioned in those settings with proper DNS prefetch and has a fallback to sans serif system font.
For extra speed and to eliminate render-blocking resources, we recommend to enable the font stylesheet inlining option under Settings > MeanThemes Tools ;)
You can control all of the font sizing across the whole theme here.
Small/Regular/Large/Larger font sizes will adjust proportionally to the global font size.
3.7 Footer Options
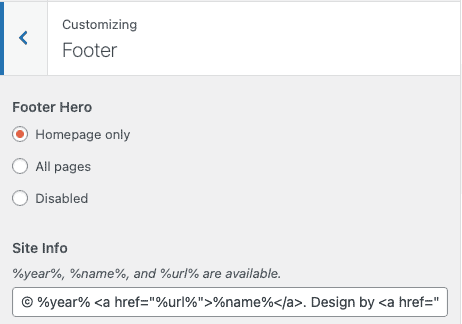
This section allows you to change the footer tagline text and select where you would like to display the footer hero/CTA section.
3.8 Additional Scripts
This section comes with our MeanThemes Tools allows you to add analytics scripts to non-AMP pages.
For AMP pages, we recommend setting up your pixels and scripts directly via the AMP settings.
3.9 Background Image
This is where you can set up a global background image.
3.10 Menus
You can choose the two main menus (left & right) here. They both support multi-level and button display. More details about this in section 6 of this documentation page…
3.11 Widgets
Add your widgets via the Customizer, this is a great WordPress feature which we take advantage on in this theme. We’ll go through this in more detail under the “Setting up your website” section, next.
3.12 Homepage Settings
Choose a static page or your latest posts for the front page. For our demo website we are using a static page with the Grid Home template.
3.9 Additional CSS
If you want to make edits to the CSS which will not be affected by a theme upgrade, please do so here.
4. Page Templates
There are just 3 page templates used on this theme,
Default This is the standard page
https://ampy.mtdemo.meanthemes.com/about/page-markup-and-formatting/
Home Grid This template displays a full-page grid of your posts or portfolio items according to your content options (Homepage post type).
https://ampy.mtdemo.meanthemes.com
No Sidebar Exactly the same as the default page layout, but without the sidebar.
https://ampy.mtdemo.meanthemes.com/sample-page/
5. Portfolio
Ampy comes with a Portfolio custom post type. You can adjust the layout from the Content section in Appearance > Customize.
6. Menus
6.1 Basic menu setup
Navigate to Appearance > Menus. You can create two menus of any name you like and put them in position via the ‘Theme Locations’ setting.
One is for the left-hand side and the other one goes to the right.
Easy :)
Here is a helpful link in case you get stuck: http://en.support.wordpress.com/menus/
6.2 Menu button
You can display any menu item as a button.
To do so, add the class btn to it.
7. Accelerated Mobile Pages
The theme is fully AMP-compatible out of the box. Simply install and activate the official plugin, and you are good to go!
8. Easy Speed Optimisation
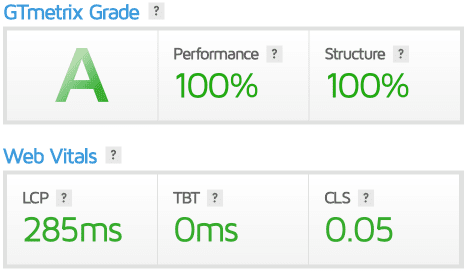
We’ve built Ampy with speed in mind and it already does wonders at core web vitals out of the box.
But some options might not find their place directly within a theme. This is why we’ve added new features to the latest release of our MeanThemes Tools plugin.
They are available from your dashboard under Settings > MeanThemes Tools.
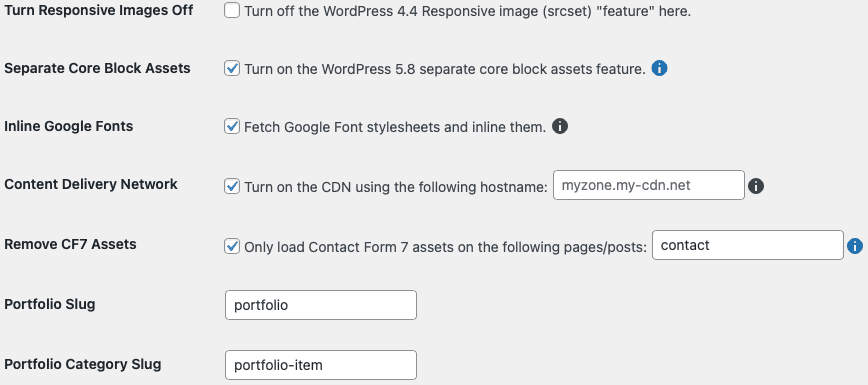
We recommend to enable Separate Core Block Assets and Inline Google Fonts for most websites.
Unless your website targets a specific geographic region and is hosted on a performant server located in the same area, using a CDN is usually recommended. This is one of the main speed factors for international websites.
If you are using Contact Form 7, we recommend enabling the Remove CF7 Assets option and adding pages where a contact form is available. You can input a comma-separated list of WordPress slugs (pages, posts, and custom post types such as portfolio are supported). If you have a contact widget/block in the sidebar or footer, you should keep this off.
If you are using WordPress Popular Posts with the default Ampy design, disable the plugin stylesheet in as mentioned in the “WordPress Popular Posts” section below.
If you would like a more personalised site speed optimisation or if you are facing any difficulty about it, don’t hesitate to reach out :)
9. Images & Image sizes
9.1 Image Sizes
If you are loading this theme onto an existing website, we’d recommend running the “Regenerate Thumbnails” plugin which will go through all of your images and resize according to this themes sizes.
You can find the plugin by typing in “regenerate thumbnails advanced” into the plugin search (Plugins > Add New) and installing it from there.
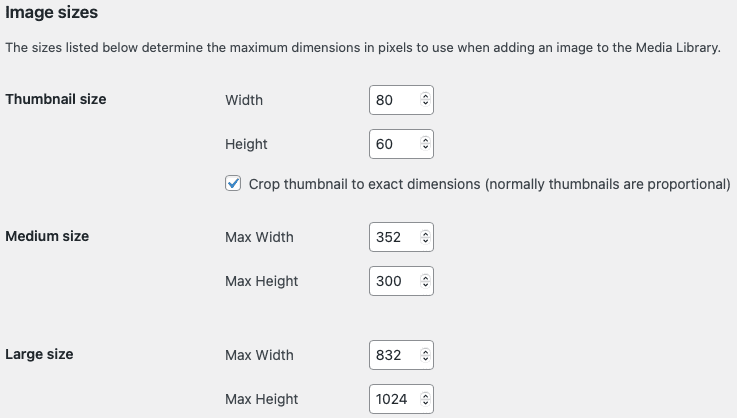
Depending on the aspect ratio of the featured images you want to use, you might also want to change the default WordPress image sizes. Here are the settings we are using for our Ampy demo website. You can edit those under Settings > Media.
9.2 Image Attributions
Featured post images used in the demo (the blue watercolour drops) are from Dan Cristian Pădureț.
10. Widgets
10.1 Widget Areas
There are 4 widget area on this theme
- Sidebar – This appears at the side of all pages, except to the frontpage post loop and the pages using the No Sidebar template.
- Hero Header – This appears at the top of the front page, below the main navigation.
- Hero Footer – This appears at the bottom of the front page, above the Footer Widget Area.
- Footer Widget Area – This appears at the bottom of all pages above the footer tagline. By default, there are 3 columns but this can be modified.
10.2. WordPress Popular Posts
Settings
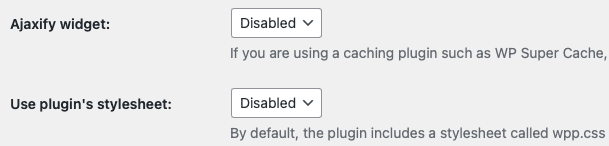
Ampy already supports a default WPP widget design. So if you’re happy with the theme design, it is safe to disable the plugin stylesheet in Settings > WordPress Popular Posts > Tools:
Blocks / Widgets
If you use the WP Popular Posts block/widget with the default Ampy design, the ideal thumbnail width is 80px.
In order to display portfolio items, you need to input “portfolio” as post type.

11. Common Problems
11.1 Missing style sheet error when installing the theme
A common issue that can occur with users new to installing WordPress themes is a “Broken theme and/or stylesheets missing” error message being displayed when trying to upload or activate the theme. This error message does not mean that the theme you have purchased is broken, it simply means it has been uploaded incorrectly. Luckily, there is a very easy fix.
Most likely, you are trying to upload the full ThemeForest archive. Try to download the “installable files only” from ThemeForest or unzip the archive you have and find the installable .zip file inside the Theme folder.
If you are still having issues, support is only one mouse click away :)
https://www.meanthemes.com/support/
12. Recommended Plugins
- AMP https://wordpress.org/plugins/amp/ This plugin automates the process of generating AMP-valid markup.
- Contact Form 7 https://wordpress.org/plugins/contact-form-7/ This plugin is used on the contact form page and we already have styling in place to match the theme.
- WordPress Popular Posts https://wordpress.org/plugins/wordpress-popular-posts/ Display a list of your most popular posts and portfolio items.
- Regenerate Thumbnails Advanced https://wordpress.org/plugins/regenerate-thumbnails-advanced/ Use this plugin to resize your images
——— Well that’s it! Thank you, we hope you enjoy your new theme.